By connecting to the device, this APP can provide unprecedented experience by enabling you to preview and play your driving videos by mobile phone, and personalizing your own settings, such as movement monitor and gravity sensitivity.
2.Can the DVR take loop videos?Yes. The DVR is equipped with loop video recording. When the storage card is full, the earliest videos, except the emergent ones, will be deleted.
3. Guidelines of indicator lights
Green light slowly flashing(1 flash/second): front camera recording
Green light fast flashing(2 flashes/second): front and rear camera recording
Green light is on: TF card unplugged. Stop recording
Blue light flashing: APP is connected
Red light flashing: firmware upgrading
Red light is on: Error in TF card, failed to record and etc。
No, you don’t need to. When the DVR is on, it’d begin auto-loop-recording and save the files in TF card.
5. Power off of the DVR
(1) For most vehicles, the OBD ports is compatible:
a. Would not turn off while driving;
b. Would automatically turn off after the vehicle is cut-off after 15 seconds;
c. Would keep turn-on for another 15 seconds when vibration is detected and the vehicle is already cut off. It would turn off when no vibration detected.
(2) If the OBD port is not compliant with the device, the DVR will fail to acquire data. Hence the device will automatically turn off when no vibration is detected within 3 minutes.
(3) If your vehicle is equipped with the “Auto-Power-On/Off” function, you can turn on the “Power off according to vibration” function on APP. With this function, the device will automatically turn off when no vibration is detected within 3 minutes.
(Attention: The device will only turn off when it’s NOT connected with the APP.)
No. The mobile phone and the DVR are connected by dot-to-dot private network, which doesn’t cost any data flow.
7. How do I download my videos and photo to PC?
(1)Unplug the device and pull out the TF card. You can download files by inserting TF card into your computer.
(2) You can download necessary files to your mobile phones first, and then connect your phone to the computer to finish the transition.
The DVR can support 128G TF card at most. Please back-up your files in the card before use. After plugging the card into the DVR:
(1) If the card is FAT 32 and empty, the DVR will execute a short formatting process.
(2) If the card is not FAT32 or empty, the red light on the DVR will be on and you will hear a voice message telling you to connect the APP with the device. After the connection, you can choose “Format TF card” in the settings.
The DVR WiFi original password is “12345678”. After connecting to the WiFi, the blue light will flash and you can go on with the next step in APP, such as preview, download and personalize settings.
If you can’t find the WiFi after a while, you can reset by pressing the small hole on the device and try again.
If the battery is lower than 11.6V, the DVR will open “Low Battery Protection” to protect the battery. Hence if your vehicle is lack of power, the machine will not be able to start up properly. You can start the machine by poking the reset hole.
11. How to adjust ADAS
You can personalize the settings, including lane-changing warning, corss-lane warning and collision warning, when you turn on the ADAS function in “Setting-Security Settings”. (If your APP is Version 3.1.0 and above, or the firmware is Version 3.0.2 and above, the APP will broadcast your driving data when connecting to the device.)
* You can adjust the installation angle by clicking the ADAS button on preview page.
We provide firmware upgrade in APP and firmware to enhance user experience and provide more interesting functions
Latest updates will be shown in “More-Version Updates” when new firmware is released. Please download in WIFI environment, connect to the device and update.
The update will take about 3-4 minutes, during which the red light will constantly flash. Please do not cut off the power or unplug the TF card. After the update, the device will start-up automatically. If fail to start the machine, please contact our customer service for further instruction.
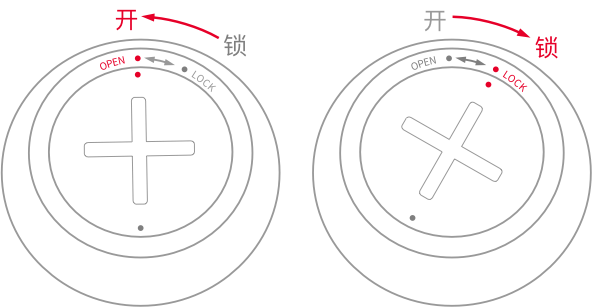
Switch the back cover to “OPEN” and you can install/change battery. If you find it difficult to open, you can use our attached tape to help.
When install the battery, please make sure the negative pole is inward, and afterward you can switch the back cover to “LOCK”.
Step 1:
Please make sure the device is connected with the power line and the machine is ON.
Open the back cover of the remote and install the battery with positive pole outward.
Do not close the cover. Press the battery and draw the remote near to the device.

Are you satisfied with the answers? If not, please contact us:
contact us service@aidrive.com